Although you can use your server to send transactional emails such as notifications, password reset and others, we recommend using an SMTP service.
SMTP Service advantages:
Send millions of emails.
Faster email delivery.
Higher deliverability rate.
IP reputation.
Domain reputation.
Reduce the chance of being blocked by email providers.
Some reasons why Email providers may block your mail:
IP reputation.
Spammy messages.
Domain reputation.
Incorrect SPF or missing DKIM.
You have been marked as spam by recipient or by anti-spam organizations.
We recommend using our SMTP Services. We offer free and paid SMTP service. More info on our SMTP service is found here.
Use Cases:
Transactional emails such as welcome messages, email verification, password reset, purchase confirmation, invoices and other emails that are sent by your site.
Your own Newsletter system.
Advantages of using SMTP services:
High delivery rate.
Fast email delivery.
Higher rate limiting.
Reduce server load.
Prevent your server IP from being blacklisted.
Prevent your server from being abused by spammers.
Prevent your email from being blacklisted.
Predictable Pricing.
Adding the SMTP Service
When on your dashboard navigate to Manage Mail > SMTP Accounts > Add SMTP Service
Add your sending domains by navigating to Manage Mail > SMTP Accounts > Sending Domains .
Add your DNS. Navigate to Manage Mail > SMTP Accounts and add the DNS records.
Navigate to Manage Mail > SMTP Accounts >Manage SMTP Users and add your SMTP users.
If using SMTP in your website SMTP settings for transactional mail, we recommend having a second SMTP user such as noreply@ yoursite.com which would need to match the FROM email of your website. There is no need to create an email account for the [email protected] though.
After you’ve set up your Email account, you may want to connect your email program such as Apple mail, Outlook or others to it in order to download your emails.
First, you’ll need the details that were emailed you when you made your email account that you want to connect to. If you don’t have those, log into your mail server and in the Mail tab, find the domain you set up and click List Accounts. Find the user you want to use and edit it. The details will be found there on the right of the screen.
Apple Mail:
Open your apple mail app.
Click Mail > Add Account.
Choose “Other Mail Account” and click Continue.
Fill in the details for the name, email, password and click “Sign in”.
Fill in the details from the email you got for this user account. Choose the Account Type “IMAP” if you want to delete mails from the server when you delete them locally or vice verse as this will sync the email. If you want to save mails on the server when deleted locally (or vice verse), choose Pop type. Click “Sign In”.
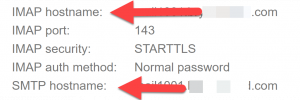
IMAP incoming and outgoing mail server details are the IMAP hostname and SMTP Hostname respectively.
If you’ve entered the info correctly, you’ll be prompted to accept the certificate. You should do this as it’s your own server so it’s safe. You’ll then select the apps you allow to use that certificate and click “done”. Test the email and it should be working fine.
For POP, the settings are the same as IMAP for the incoming (IMAP hostname) and outgoing (SMTP hostname)
Windows 10 Mail (Outlook):
Open outlook and choose Add Account.
Choose “Advanced Setup” and choose “Internet Mail.”
Fill in the email address, user name and password.
Account Name will be what you want to use to remember what account this is.
Incoming Mail server is the IMAP hostname.
You can choose IMAP or Pop3 as the account type.
Outgoing Mail server is the SMTP hostname.
Once you save it, test the mail sending and receiving.
Using SMTP with Outlook for Outgoing Mail
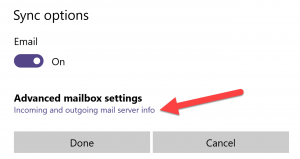
For the account that you want to use SMTP for outgoing mail, click to edit the account and select “Change Mailbox Sync Settings.”
At the bottom of the popup, choose “Advanced Mail Settings.”
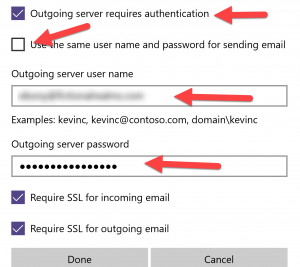
Make sure to uncheck “Use same username and password for sending mail” under the Outgoing Mailserver setting.
Enter your SMTP username and password in the input boxes.
Select “Requires Authentication: YES.”
Most if not all ISPs usually block port 25 for SMTP so it will be better to change the SMTP port.
Go to “Advanced” tab still under “More Settings” window.
Outgoing Server (SMTP): 587 or 465
Encrypted Connection: TLS
TIP: To find your BryZar SMTP settings In your BryZar client dash > manage mail > smtp accounts You’ll see details like this: SMTP Server/Hostname: relay101nyc.networkstead.com SMTP Port: 587 SMTP Security: SSL / TLS Authentication: YES
Our Free Offsite Backups uses FTP protocol. It is used as repository for your backup files. It is on a shared environment. You can configure the backup frequency/interval from your hosting panel.
Bryzar billing system works on Credits/Funds. Whether you are purchasing Managed Website Services, Managed Hosting, or Professional Services you’ll need to use Credits/Funds in order to purchase those services. This tutorial will explain what Credits/Funds are, how to purchase them and how to use them.