Setting DNS Records

A DNS “A” record connect your domain name to your server IP address. “A” records let users enter your domain name in a Web browser to access your website.

Using BryZar DNS Manager

  • If you host with us, you would go to your client dashboard and click to Manage DNS.
  • If you have not added the domain/zone then please add from Manage DNS.
    Add DNS Zone BryZar
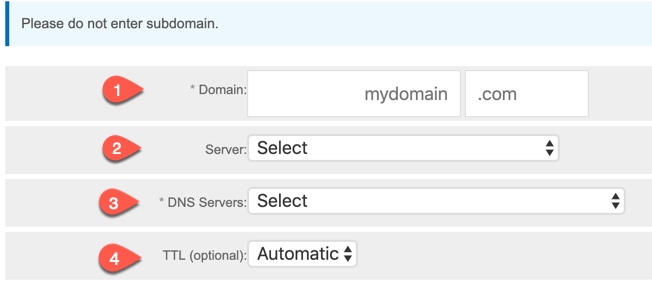
    1. Add your domain. Don’t enter a subdomain here.
    2. Select the server.
    3. Select the DNS server.
    4. Set the TTL or leave it automatic.
  • Once the nameservers are ready, you will need to change the assigned nameservers from your domain registrar to the nameservers provided in “Manage DNS.”
    eg. ns1.yournameserver.com, ns2.yournameserver.com

Note:
For TTL you can set it as low as 300 for faster propagation then later change it to 7200 or higher. You may also want to add a CNAME or A record for “www”.

Using Other DNS

If you want to use your own DNS, Cloudflare or your registrar, please see their specific instructions as each provider is different.
Adding an “A” record:
Type:
A
Name: yourdomain.com
Value: your_server_ip_address
TTL: 1800

Note: DNS propagation may take a couple of hours, or 24-72 hours depending on your domain registrar. 

FTP & SFTP Basics

In order for you to upload files to the server, you will need an FTP client software installed on your desktop/computer. If you want to upload via SFTP, you’ll want to use software that supports that.

Continue reading FTP & SFTP Basics

VestCP SSL Certificate and CSR

For added security for your site it is recommended to always use secure protocol or HTTPS. To achieve this you need an SSL Certificate.

The Vesta hosting panel can generate a Free SSL Certificate using “Lets Encrypt”.

Enable Lets Encrypt SSL:

1. Login to your hosting panel using the “admin” user.

Then go here

user > (webuser) > login as (webuser) > web > yourdomain.com > edit

Note: Webuser is the user assigned for your website.

2. Enable the “SSL Support” checkbox and “Lets Encrypt Support”.

3. Hit “Save” button

Using other SSL certificate:

1. Login to your hosting panel using the “admin” user.

Then go here

user > (webuser) > login as (webuser) > web > yourdomain.com > edit

2. Enable the “SSL Support” checkbox

3. Click “Generate CSR” link

– Fill up the form and click “ok” button.

– Copy the CSR (Certificate Signing Request) and the SSL Key to your desktop.

– Your SSL authority / provider (eg. Comodo) will ask for your CSR to generate the SSL Certificate.

4. Once you receive the SSL Certificate from your provider you can go back here

user > (webuser) > login as (webuser) > web > yourdomain.com > edit

5. Enter the SSL Certificate, SSL Key and SSL Certificate Bundle/ Intermediate.

6. Hit “Save” button

If your certificate expires, follow the above steps to log in as user and go to web > yourdomain.com > edit

Disable the “SSL Support” checkbox and click Save.

Go back again and click to Enable SSL Support and click save. This will reestablish the SSL certificate.

BryZar Hosting Quick Guide

Setting up hosting is very simple with BryZar. Follow these easy steps to get up and running quickly.

Continue reading BryZar Hosting Quick Guide

%d bloggers like this: