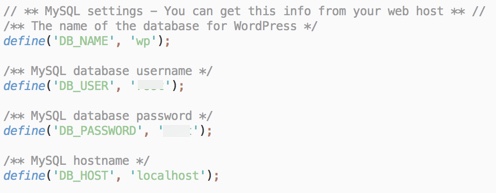
Change your database config in your wp-config.php file for the database username, password and database name to your new database details. It’s normally not necessary to change the hostname unless it is something other than “localhost”.
That’s it! You should be all set. However, if you have any issues feel free to contact our support.
If you need more options than general FTP offers, SCP programs are a good alternative for those not familiar with SSH. This tutorial will give a general idea of how to use SCP programs.
After you’ve set up your Email account, you may want to connect your email program such as Apple mail, Outlook or others to it in order to download your emails.
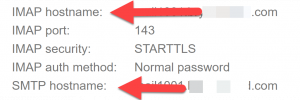
First, you’ll need the details that were emailed you when you made your email account that you want to connect to. If you don’t have those, log into your mail server and in the Mail tab, find the domain you set up and click List Accounts. Find the user you want to use and edit it. The details will be found there on the right of the screen.
Apple Mail:
Open your apple mail app.
Click Mail > Add Account.
Choose “Other Mail Account” and click Continue.
Fill in the details for the name, email, password and click “Sign in”.
Fill in the details from the email you got for this user account. Choose the Account Type “IMAP” if you want to delete mails from the server when you delete them locally or vice verse as this will sync the email. If you want to save mails on the server when deleted locally (or vice verse), choose Pop type. Click “Sign In”.
IMAP incoming and outgoing mail server details are the IMAP hostname and SMTP Hostname respectively.
If you’ve entered the info correctly, you’ll be prompted to accept the certificate. You should do this as it’s your own server so it’s safe. You’ll then select the apps you allow to use that certificate and click “done”. Test the email and it should be working fine.
For POP, the settings are the same as IMAP for the incoming (IMAP hostname) and outgoing (SMTP hostname)
Windows 10 Mail (Outlook):
Open outlook and choose Add Account.
Choose “Advanced Setup” and choose “Internet Mail.”
Fill in the email address, user name and password.
Account Name will be what you want to use to remember what account this is.
Incoming Mail server is the IMAP hostname.
You can choose IMAP or Pop3 as the account type.
Outgoing Mail server is the SMTP hostname.
Once you save it, test the mail sending and receiving.
Using SMTP with Outlook for Outgoing Mail
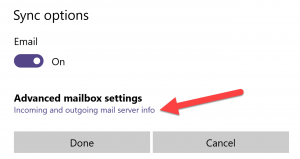
For the account that you want to use SMTP for outgoing mail, click to edit the account and select “Change Mailbox Sync Settings.”
At the bottom of the popup, choose “Advanced Mail Settings.”
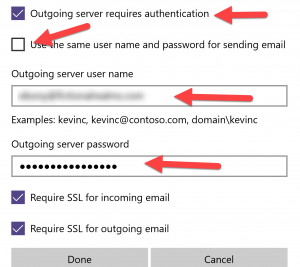
Make sure to uncheck “Use same username and password for sending mail” under the Outgoing Mailserver setting.
Enter your SMTP username and password in the input boxes.
Select “Requires Authentication: YES.”
Most if not all ISPs usually block port 25 for SMTP so it will be better to change the SMTP port.
Go to “Advanced” tab still under “More Settings” window.
Outgoing Server (SMTP): 587 or 465
Encrypted Connection: TLS
TIP: To find your BryZar SMTP settings In your BryZar client dash > manage mail > smtp accounts You’ll see details like this: SMTP Server/Hostname: relay101nyc.networkstead.com SMTP Port: 587 SMTP Security: SSL / TLS Authentication: YES
It is common to receive a warning from browsers if you are using a self-signed certificate. You usually see this warning when you are accessing your web panel or file manager. Do not worry. Your browser is just simply saying they don’t recognize your SSL certificate because it is not issued by a Certificate Authority. Since you are accessing your own server then there’s nothing to worry about as you trust your server.
In order for you to upload files to the server, you will need an FTP client software installed on your desktop/computer. If you want to upload via SFTP, you’ll want to use software that supports that.
We offer Free Website Migration on selected hosting plans. If your plan is qualified for free site migration you should see the Site Migration service added in your account. To request migration service you can submit a support ticket.
Our Site Migration services is only for clients with hosting from us.
Site Migration Requirements:
Size: up to 10GB
your old host/server IP
FTP/SSH and MySQL port
SSH/FTP/SFTP/SCP login (SSH access is preferred)
Database access – phpmyadmin or MySQL user/password
For large sites please submit a ticket.
Note: Your old server/host must have open ports for FTP/SSH/MySQL. If your old host/server has a firewall please contact your old host to open the ports.
Migration time depends on the size of the site and access to your current server. Usually it takes longer with sites under shared hosting. Therefore, there’s no specific time frame as there are a lot of things that affect migration. Usually it takes less than 24 hours for small sites with root access and good connectivity between servers. For medium or bigger sites it can be from 24 hours or longer.