Business Email – Importing Your Email

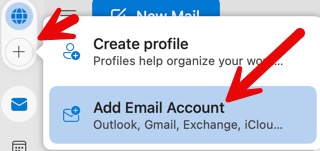
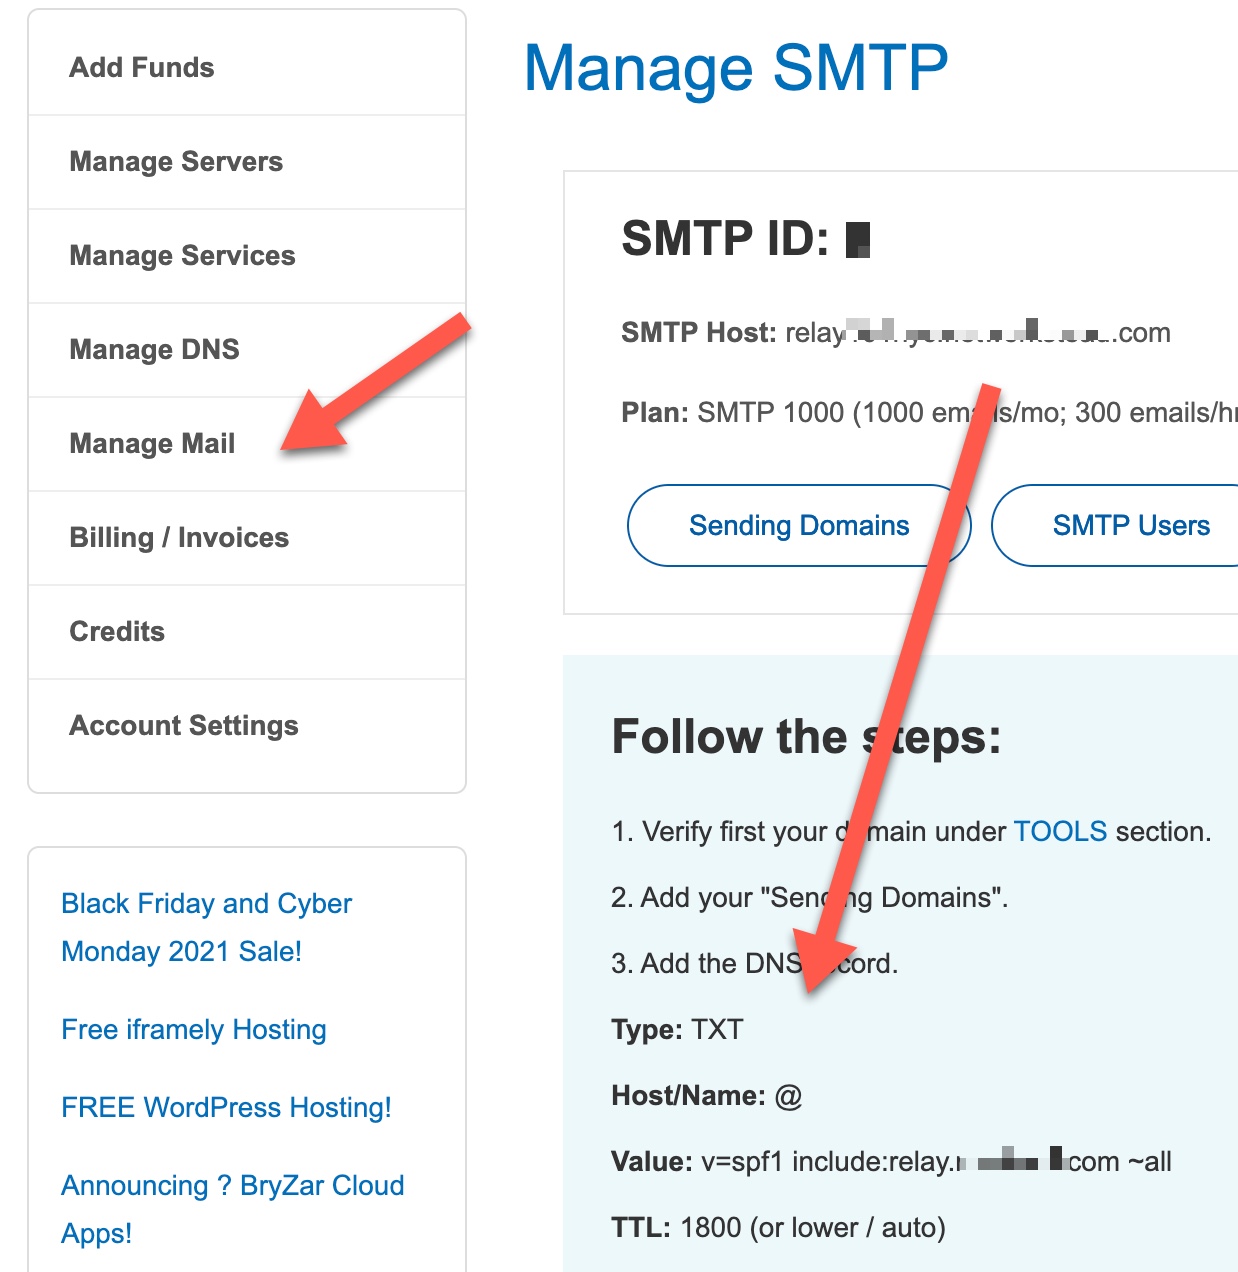
You can import your Email, contacts, calendars, tasks and notes into the new BryZar Business Email service quite easily. Here’s how (for this tutorial we will use Roundcube):

  • Log into webmail as a user, with your Email address and password.
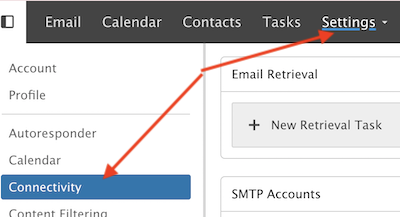
  • Click the Settings icon.
  • Click on Connectivity.
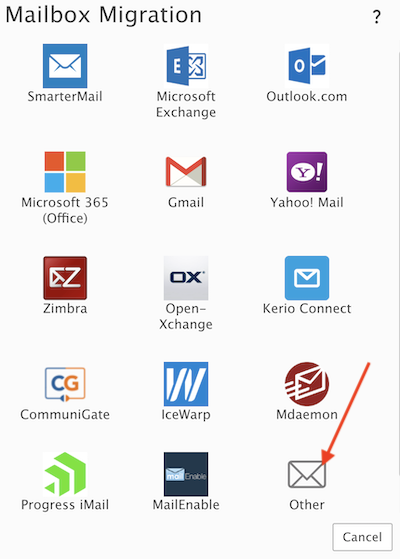
  • In the far right, you’ll see the Mailbox Migration box. Click the Migrate button.
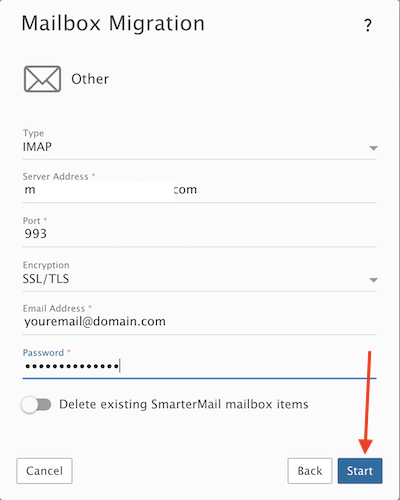
  • In the popup, if migrating from Roundcube, choose “Other.” If migrating from another source, please choose the appropriate one.
  • Fill in the following details you received when your Email you want to import was set up:
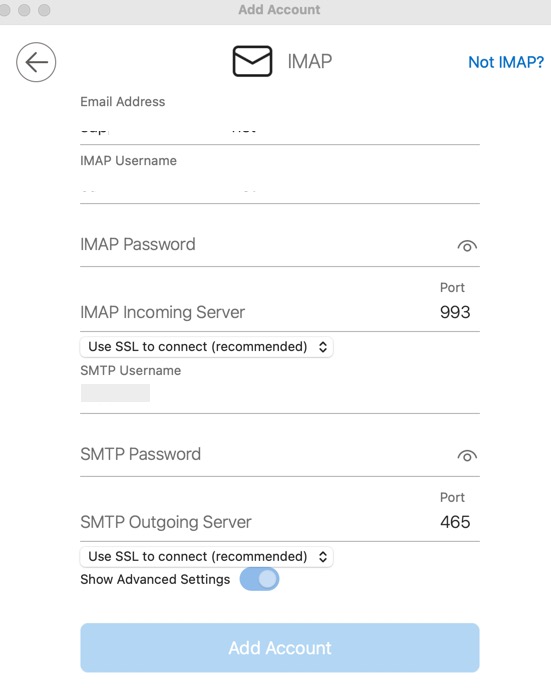
    • Type – This will either be POP or IMAP. The difference is that POP will pull ONLY messages from the Inbox whereas IMAP may be able to pull additional items such as calendars. We recommend IMAP and will use that for this tutorial.
    • Server Address – From the Email setup information for the Email you are importing, this is the SSL server using port 993 for IMAP. If using POP, it is port 995.
    • Port – The port that’s associated with the Type you’ve selected. Either 993 for IMAP or 995 for POP.
    • Email Address – This is the full email address you’re migrating over. For example, [email protected]
    • Password – This is the password you use to log into the account you’re migrating over.
    • Require SSL – This is enabled by default, requiring a secured login.
  • Delete existing SmarterMail mailbox items – Enabling this will overwrite any existing SmarterMail data with the data that’s being migrated over. That includes all contacts, calendar entries, etc. If this is NOT enabled, the migrated data will be “merged” into any existing data and nothing is overwritten.
  • Click the “Start” button to start the migration. Please wait for it to finish. If you have a lot of mail to import, it could take some time.

If you have any questions about importing your mail into the Business Email service, please feel free to open a ticket and we’ll be happy to assist.

Business Email – Creating an Email Account

If you want to create more email accounts, please follow these steps.

Creating Accounts Manually

  • Log in to your workspace (webmail) with your admin user.
  • In the top menu, navigate to More > Domain Settings.
  • Click the “New” button at the top of the middle column.
  • Fill in the details in the popup:
    • Username: this will be the user’s log in name. For example, if you want [email protected] you would put johnb as the username. Don’t fill in @yourdomain.com as that will automatically be created.
    • Password: create a strong password, at least 8 digits long and not the user’s username.
    • Force password change at next login: we recommend checking this box as it will be more secure if the user changes their password.
  • Click Save to create this email account.

Once you’ve filled in all the details and saved it, you’ll be on a screen to manage this new email account. Set the settings as you want them, or leave them as is.

Importing Users

To add users via CSV import, click the Actions button and choose Import from CSV.

Upload the CSV file that contains the user information and click Next. The first page of the import modal will allow you to map the CSV column headers to the appropriate configuration option. For example, if your CSV contained a column header for “user name”, you can select the “Username” mapping.

At minimum, the CSV file must contain a “Username” column header. All remaining configuration options will mimic the domain’s User Defaults template. If no “Password” column header is provided in the CSV, the import modal will prompt you to create a temporary password for the user(s) being imported. Those users will be prompted to change their password the next time they log into the webmail interface.

If you have any questions about creating Emails (users) in the Business Email interface, please submit a support ticket and we’ll be happy to help.

Business Email – Using Outlook, Apple Mail and other Email clients

You can use your favorite Email client (Outlook, Apple Mail, Thunderbird, etc) with BryZar’s full featured Business Email. We’ll show you how to set up a few below.

Setting up Outlook

Please note that we are using Outlook on a Mac. These steps should be similar on other OS.

  • Open outlook and choose add new account.
  • Fill in the Email address and click continue.
  • Click “Not Exchange” on the next screen. It’s near the top of the page.
  • Choose IMAP (we recommend this over Pop3 but you can choose that instead if you prefer).
  • You can choose to sync with the Microsoft Cloud but we prefer to sync directly with Imap, so for this tutorial we will click that.
  • On the next popup, you’ll fill in the IMAP details that were sent to your Email or that your administrator gave you.
    • Email address: this should already be filled in, as your Email.
    • IMAP username: leave this as is, it should be filled in as your Email.
    • IMAP password: this is the Email password.
    • IMAP incoming server: the SSL server using port 993
    • Port: 993 (this is the SSL port for IMAP)
    • Drop down for “Use SSL to connect”. Leave this set as it is. If not set, please choose to use SSL to connect.
    • SMTP username: this is your email address and should be filled in.
    • SMTP password: same as the email password.
    • SMTP outgoing server: the SSL server using port 465.
    • Drop down for “Use SSL to connect”. Leave this set as it is. If not set, please choose to use SSL to connect.
    • Once done, click Add Account.
  • You can choose a profile or skip this step. All set!

Setting up Apple Mail

  • Open your Apple mail app.
  • Click Mail > Add Account.
  • Choose “Other Mail Account” and click Continue.
  • Fill in the details for the Name, Email, password and click “Sign in”. Your Email and password were either mailed to you, or you got them from your administrator when your Email address was set up. It will try to sign in but cannot as we’ve not yet set up the Incoming and Outgoing details. That comes next.
  • Fill in the details from the Email you got for this user account.
    • Username: this is your Email address. It should be set to “automatic” and not need to be filled in. However, if it is not showing “automatic” then fill in your Email address.
    • Password: this is already filled in with your password you already entered. If not, fill in the password for your Email.
    • Choose the Account Type “IMAP” or Pop3. We recommend IMAP.
    • Incoming Mail Server: the SSL server using port 993. Note that the ports won’t show here but will automatically be set.
    • Outgoing server: the SMTP SSL server using port 465.
  • Click “Sign In”.
  • You’ll now see a popup to choose the apps to use. Keep “Mail” checked and click “Done.” Now you’re all set!

Setting up Thunderbird

  • Click File > New > Existing Mail account
  • Fill in your Email address and password. You can also change the full name if you need to.
  • Click Continue
  • If Thunderbird doesn’t automatically configure the settings, click “configure manually” and enter the necessary IMAP server details. We recommend IMAP over POP3 but you can choose pop3 instead. See the screenshot below.
  • Incoming details – note that your log in details were sent via email:
    • Protocol: IMAP
    • Hostname: This is the IMAP SSL/TLS host name sent via email.
    • Port: 993 (this is the SSL port for IMAP)
    • Connection security: Leave this at SSL/TLS
    • Authentication method: Leave this at Autodetect
    • Username: this is your email address
  • Outgoing Server:
    • Hostname: This is the SMTP outgoing hostname sent via email
    • Port: 465 or 587 usually, found in your email under the SMTP outgoing email.
    • Connection security: Leave this at SSL/TLS
    • Authentication method: Leave this at Autodetect
    • Username: this is your email address
  • Click Re-Test and thunderbird will try to connect. If successful, you’ll see a success method.
  • Click Done and on the final screen, click Finish. You should be all set now!

If you have any questions about the Business Email service, please feel free to open a ticket and we’ll be happy to assist.

Bryzar Premium Email

Here’s how to set up the BryZar Premium Email service.

STEPS

  1. Create a Premium Email Service
  2. Add your mail domain
  3. Add the MX and TXT records in your DNS
  4. Setting up the Mailbox
  5. Activation of Spamexperts

Step One – Create a Premium Email service

  • Log in to the Bryzar client dashboard.
  • Navigate to My Account > Add Service > Premium Email.

NOTE: If you are only adding mail domains on your existing Premium Email Service then no need to do STEP 1. The service account will be manually set up. You will receive the details for the MX and TXT records, as well as the log in for the mail server and anti-spam portal.

Step Two – Add your mail domain

  • Log in to your assigned mail server (https://mail.yourmailserver.com:1500)
  • Navigate to Mail and click “Mail Domains”.
  • Click “Create Mail Domain”.
    Name: yourdomain.com
    IP Address: receive automatically
    Default Action: Reply Error
    Enable DKIM: Disabled (Note: No need to set the DKIM as it will be set automatically.)

IMPORTANT: If you are adding more mail domains to your Premium Email Service account then you need to submit a ticket for each new mail domain for Spamexperts activation.

Step Three – Add the MX and TXT records in your DNS

  • If using BryZar Premium DNS, follow this tutorial .

    The DNS records are included in the details you received when creating the Premium Email service.

Step Four – Setting up the Mailbox

  • Log into your mail server.
  • Click Mail > Create Mailbox
  • Enter the name for the mailbox such as “info” which would then create an email address of [email protected]
  • You can enter aliases for the mail if you want them. However, we do not allow email forwarding.
  • The password field has a generate capability for generating the password or you can make your own.
  • Once done, click Create. The image below shows the various settings when adding a mailbox.

Step Five – Activation of Spamexperts

After the activation of Spamexperts you will receive the anti-spam account login and the required DNS records.

Replace the MX records you added in step three with the MX records you receive from the Spamexperts activation. No changes need to be done to the TXT records.

Checking and Sending Email

To check mail, you can either use the web interface or an email program. Here’s how:

Using Webmail

To use the web interface, when in the Mail page in your mail server, click Mail Client at the top.

Using SMTP

If you need to use SMTP to send from email clients such as outlook, apple mail, etc., then you will need to create an SMTP account. You can use other SMTP Services or Bryzar SMTP Service.

If using BryZar SMTP, please follow the tutorial to set it up. This is required for sending mail in bulk or more than 10 messages.

Please note that your SMTP user needs to match your mailbox account (e.g. [email protected]).

Using an Email Client such as Apple Mail, Outlook, etc

Note: In order to send mail from an email program, you will need to use an SMTP service. You can use the free BryZar SMTP service or choose another SMTP provider.

To use an email program such as Apple Mail, Outlook, etc follow below. Please note that we do not recommend using Thunderbird as there is a bug that causes issues.

Apple Mail.

  1. Choose Add Account
create email apple
  1. Choose Other Mail Account.
add other email apple
  1. Choose Imap or Pop3 depending on which you prefer. Imap will download the mail and keep it on the mail server, whereas pop3 will download the mail and delete it from the server.
  2. Username: [email protected] (example: [email protected])
  3. Password: this is the password you set when creating the email
  4. Hostname: your email server (example: mail1111.yourmailhost.com) This will be the same as the webmail domain.
  5. Port (depends on whether you choose Imap or Pop3)Imap: 993
  6. Pop3: 995
  7. Connection Security: TLS/SSL
  8. Authentication: Normal Password
  9. Once saved, if it won’t connect, right click on the mailbox name and choose Edit. This will open advanced settings. You do need to do this step in order to set the SMTP settings.
  1. Choose Server Settings
apple mail server settings
  1. Unclick Automatically manage connection settings
  2. Set the ports to be the same as the settings above.
  3. For Outgoing Mail Server (SMTP) set the settings per the SMTP settings from your BryZar SMTP server or your SMTP provider. It’s important to have the sending email the same as the SMTP user name.

Outlook:

  1. Add Mail Account
  2. Enter your email and password and click continue.
  3. If it doesn’t find the correct details as shown above, click Configure Manually.
    1. Make sure the settings match for the port, connection security, and authentication.
    2. Enter the SMTP details from your SMTP host settings in the Outgoing Server configuration.
    3. Make sure Authentication is “Normal”.

LIMITATIONS:

  • You cannot forward email as it is not allowed due to spam considerations. It wouldn’t be good if you got spam emails and then forwarded that to your other email such as gmail, as it would cause your email to be marked as spamming and you would get blacklisted. This would cause you to be unable to send mails any longer as gmail, apple, etc would block you.
  • You cannot send more than 10 messages at a time. This is to prevent bottlenecks and possible spam complaints. You cannot send to more than 10 email addresses at a time. Instead, you will need to use an SMTP service, such as the BryZar SMTP, to send mass emails (more than 10 emails at a time).
  • Sending limit is 100 per hour. (Please use our SMTP Service for sending more mails)

BryZar Premium DNS

BryZar Premium DNS is a convenient way for you to manage DNS for your domain. If you need any help in setting up the DNS, please create a ticket and we’ll be happy to assist.

Steps to set up the DNS

You’ll need to be logged in to the DNS manager.

Step One

Add a Zone

  1. Click to register new zone
check mail via webmail
  1. Choose Master Zone
  1. Choose just the two NS, “pns41” and “pns42” , as seen below.
  1. Add your domain and click Create as seen above.
  2. After adding the domain in the DNS you will need to change nameservers at your domain registrar to the nameservers you have selected.
    eg.
    pns41.yournameserver.com
    pns42.yournameserver.com

Step Two

Add “A” Records

  1. Add the “A” records by clicking “A” at the top and selecting to Add New Record.
  1. Fill in the details that you received when you set up your server. Leave the TTL as the default setting seen in the image below.

Type: A
Name: yourdomain.com
Value: your_server_ip_address

Note: You can also add the “www” A record by following the above. For Host, enter www in the Host input box, leave the TTL at default and add your server IP in the “Points to” input box.

Step Three (optional)

This step is only required if you are using our Email services like Premium Email or SMTP Services.

Add TXT Records (for SMTP)

  1. Choose TXT > Add New Record.
  1. Fill in the details that you received when you set up your SMTP server. You can find this info when logged in to the BryZar dashboard > Manage mail > SMTP Accounts. It will show at the bottom under “Follow these steps”.
  1. Leave the TTL as the default setting seen in the image below.

Add MX Records (for Email)

  1. Click “MX” when logged in to the DNS manager and viewing the records for the appropriate domain. Choose to Add New Record.
  1. Fill in the details that you received when you set up your Email. You’ll create two MX records.

Referral and Credit System

Credits Types

1. Regular Credits/Funds

2. Affiliate Credits

  • Credits earned from affiliate/referrals.
  • Can be withdrawn or transferred to affiliate’s PayPal account.
  • No expiration.

3. Free Credits

  • Free Credits can be used as a discount on products and free tier.
  • Not convertible to cash, cannot be withdrawn.
  • Expiration depends on settings or promo.

How to earn

  1. Referrals will enter/use the Affiliate Code to get $50 Free Credits.
  2. Affiliates get $25 Affiliate Credits and $25 Free Credits for each successful referral.
    • Affiliates get the $25 Free Credits once the referral has verified payment.
    • Affiliates get the $25 Affiliate Credits once the referral has reached at least $25 in spending. This means that they added at least $25 funds and have consumed at least $25 in total products not counting the discounts and free credits.

Payouts

Affiliates can request payout for Affiliate Credits to their PayPal account.

Please feel free to contact us if you have any questions!

Using BryZar Cloud Apps

The BryZar Cloud Apps can take 2-24 hours to be set up, depending on your order. Once you receive the server details in your email, you’ll need to set your DNS records or use BryZar DNS servers. Propagation of the DNS can take 24-28 hours.

Here’s how to work with the BryZar Cloud Apps:

1. Uploading Files

  • You can access or upload files in Cloud Apps using SSH/SFTP.
  • You can also use web based SFTP such as MonstaFTP (https://www.monstaftp.com/) or a file manager such as Extplorer (https://extplorer.net/).

2. Managing Database

  • To access your database you can connect via cli.

    # mysql -h yourdbhost -u youruser -p
  • You can use web based tools such as Adminer (https://www.adminer.org/) to manage your database easily.

Note: The database can only be accessed through the app server. You cannot access the database remotely.

3. Adding cron job

  • You can add cron jobs through cli.

# crontab -e

If you need any help with cron jobs, or if you have any questions please feel free to open a ticket.

Free Credits

You can get free credits by entering a Promo Code in the credits section from the dashboard.

dashboard > credits

  • You can only get Free Credits once.
  • To use the Free Credits in a plan, you need to get the Free Credits before purchasing a service/server.
  • You can apply Free Credits on plans that are applicable.
  • To see the applicable credits, once you try to create a server you should see, for example, “$5 cr/mo”.
  • If the plan price is $25/month and the applicable credits is $5/month, then your invoice will only be $20/month.
  • Free Credits will automatically apply on your monthly invoice if you have available/active Free Credits.
  • Once your Free Credits have expired or drained, then the monthly invoice will go back to original price.
  • Free Credits are not exchangeable for cash.

Setting DNS Records

A DNS “A” record connect your domain name to your server IP address. “A” records let users enter your domain name in a Web browser to access your website.

Using BryZar DNS Manager

  • If you host with us, you would go to your client dashboard and click to Manage DNS.
  • If you have not added the domain/zone then please add from Manage DNS.
    Add DNS Zone BryZar
    1. Add your domain. Don’t enter a subdomain here.
    2. Select the server.
    3. Select the DNS server.
    4. Set the TTL or leave it automatic.
  • Once the nameservers are ready, you will need to change the assigned nameservers from your domain registrar to the nameservers provided in “Manage DNS.”
    eg. ns1.yournameserver.com, ns2.yournameserver.com

Note:
For TTL you can set it as low as 300 for faster propagation then later change it to 7200 or higher. You may also want to add a CNAME or A record for “www”.

Using Other DNS

If you want to use your own DNS, Cloudflare or your registrar, please see their specific instructions as each provider is different.
Adding an “A” record:
Type:
A
Name: yourdomain.com
Value: your_server_ip_address
TTL: 1800

Note: DNS propagation may take a couple of hours, or 24-72 hours depending on your domain registrar. 

Using Softaculous

Softaculous is a great tool for installing website software. It has over 400 scripts for you to easily install. Follow these steps to use Softaculous.

We recommend that you have SSL installed on your domain before proceeding.

  1. Log into Vesta.

2. Click “Apps” in the top menu.

3. You’ll be brought to the Softaculous page that lists all of the available software that you can install.

4. Choose the software you want to install. For this tutorial, we’ll install WordPress.

5. Hover the mouse over the WordPress icon and click “Install.”

6. Choose the software setup you want. We recommend keeping it https secure. To install in the root (public_html) which is recommended, delete “wp” from the “In Directory” line, leaving it blank. When choosing the domain, be extra careful to choose the right one if you have more than one domain on the server.

7. Enter your site name and description.

8. Add your admin details. We recommend clicking to generate a random password. Be sure to copy down the details.

9. Choose your language and select your plugins.

10. To setup the database with the install, click Advanced Options. You can select for WordPress, plugins and themes to automatically update if you want to save the hassle of upgrading each time there’s a release.

Do not select the automatic backups. You already have free offsite backups with BryZar hosting. Setting the backup setting here can cause issues with your server or corrupt backups.

Before clicking Install, be sure to fill in an email for the details to be sent.

After clicking Install, it will take a few minutes for the software to download to the server. You’ll see a success message once install completes.

%d bloggers like this: